Overview
This document provides developers with clear and efficient steps for quickly integrating TRTC Web SDK components through Model Context Protocol (MCP) Server in AI-assisted programming IDEs (such as Cursor, Trae, CodeBuddy, VSCode), enabling AI to automatically generate project initialization and integration code. By configuring the MCP Server, AI can call the toolset provided by @tencentcloud/sdk-mcp to help you complete the following tasks:
- Automatically generate integration code, eliminating the need for manual writing of repetitive code.
- Help solve common problems and provide solutions.
Note: RTC Engine web SDK is also known as TRTC Web SDK, and will be uniformly referred to as TRTC Web SDK below.
Step 1: Environment Preparation
1. Basic Development Environment Preparation
Ensure your local development environment has the recommended versions of Node.js and npm (Node Package Manager) installed.
-
Download and Installation:
-
Visit the Node.js official website to download and install the version suitable for your operating system.
-
Recommended Version: It is recommended to use the Node.js LTS (Long Term Support) version, typically in the 18.x or 20.x series.
-
-
Verification: After installation, open the command window (or command prompt/terminal) on your computer and run the following commands to verify the versions:
-
Windows System: Press the
Winkey +Rkey, entercmd, then press Enter to open. -
Mac System: Press
Command+Space, enterTerminal, then press Enter to open.
node -v npm -v-
If the version numbers are correctly displayed, the environment preparation is complete.
-
If it shows
command not foundor other errors, please provide the complete error message screenshot or text content to AI for more efficient problem-solving.
-
2. Real-Time Audio and Video TRTC Application Information Preparation
Obtain your own Tencent Cloud Real-Time Audio and Video TRTC application credentials:
-
Register Account: Register a Tencent Cloud account.
-
Create Application: Create a Real-Time Audio and Video TRTC application in the Tencent Cloud console.
-
Obtain Keys: Get the TRTC application's
SDKAppIDandsecretKey, which will be used as environment variables when configuring MCP.
Step 2: MCP Tool Configuration
Before using MCP tools, you need to configure them in your code editor's (e.g., Cursor, Trae, CodeBuddy, VSCode) configuration panel. It is recommended to configure them in the root directory of your current project.
【CodeBuddy Configuration Guide】
-
Click Settings > Add MCP to open
settings.jsonand configure MCP.
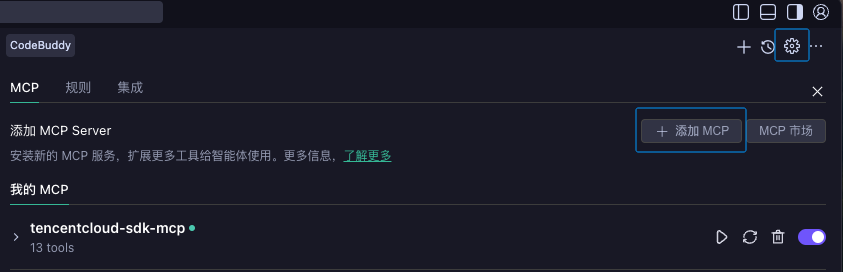
- Update the
mcpServersconfiguration information to thesettings.jsonfile and save it.
{
  "mcpServers": {
    "tencentcloud-sdk-mcp": {
      "command": "npx",
      "args": ["-y", "@tencentcloud/sdk-mcp"],
      "env": {
        "SDKAPPID": "YOUR_SDKAPPID",
        "SECRETKEY": "YOUR_SECRET_KEY"
      }
    }
  }
}
Note: Please save your modified configuration file promptly.
Windows Users:
Ctrl+S, Mac Users:Command+S.
- Check if MCP tools are successfully loaded.

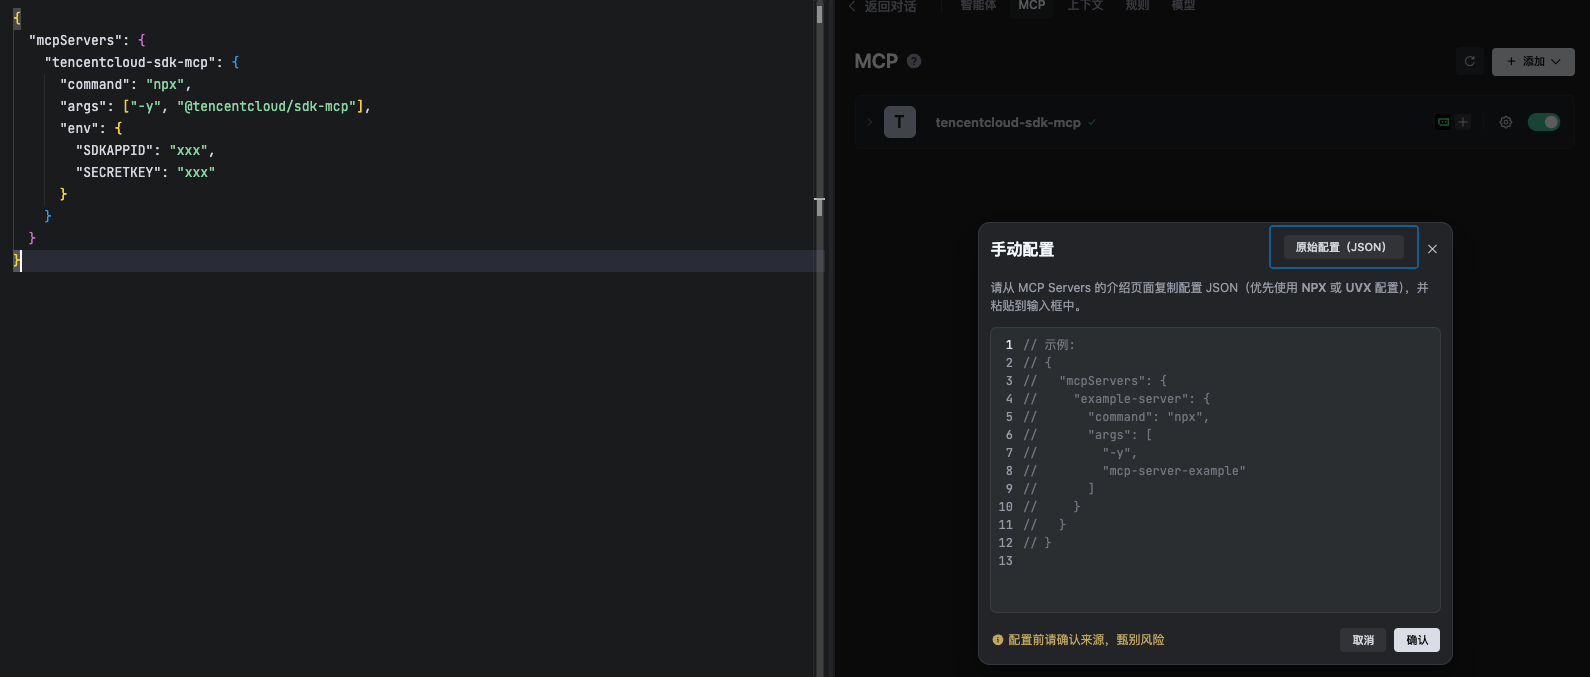
【Trae Configuration Guide】
-
Click Settings > MCP > +Add > Manual Add
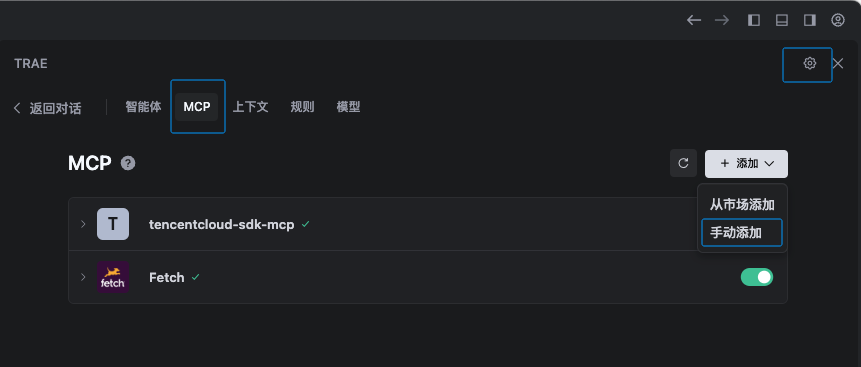
- Click Raw Configuration (JSON) to open the configuration file, update the
mcpServersconfiguration information to the configuration file and save it.
{
  "mcpServers": {
    "tencentcloud-sdk-mcp": {
      "command": "npx",
      "args": ["-y", "@tencentcloud/sdk-mcp"],
      "env": {
        "SDKAPPID": "YOUR_SDKAPPID",
        "SECRETKEY": "YOUR_SECRET_KEY"
      }
    }
  }
}
Note: Please save your modified configuration file promptly.
Windows Users:
Ctrl+S, Mac Users:Command+S.
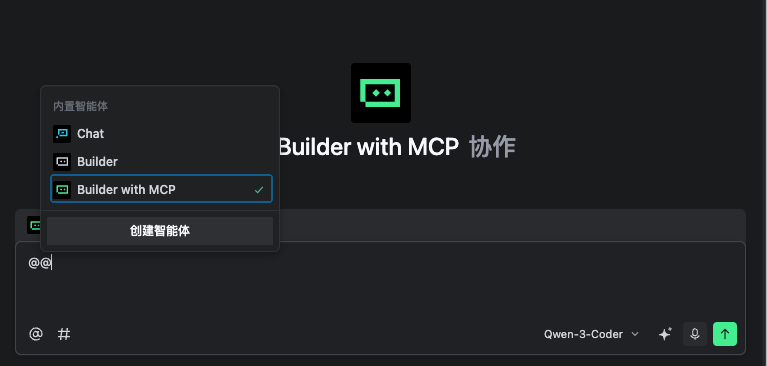
- Select the editor's default Builder with MCP or add MCP to your custom Builder.
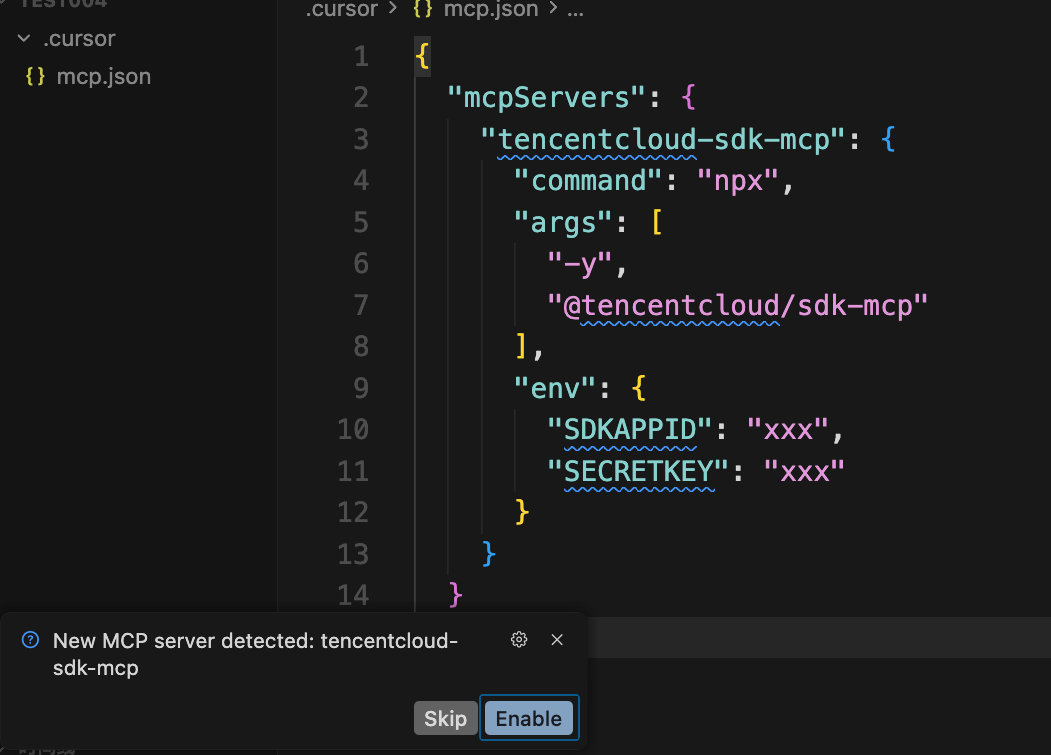
【Cursor Configuration Guide】
-
Create a
.cursor/mcp.jsonfile in the project root directory, update themcpServersconfiguration information tomcp.jsonand save it.
{
  "mcpServers": {
    "tencentcloud-sdk-mcp": {
      "command": "npx",
      "args": ["-y", "@tencentcloud/sdk-mcp"],
      "env": {
        "SDKAPPID": "YOUR_SDKAPPID",
        "SECRETKEY": "YOUR_SECRET_KEY"
      }
    }
  }
}
Note: Please save your modified configuration file promptly.
Windows Users:
Ctrl+S, Mac Users:Command+S.
- When saving the file, the following prompt will appear, select Enable to activate MCP tools.
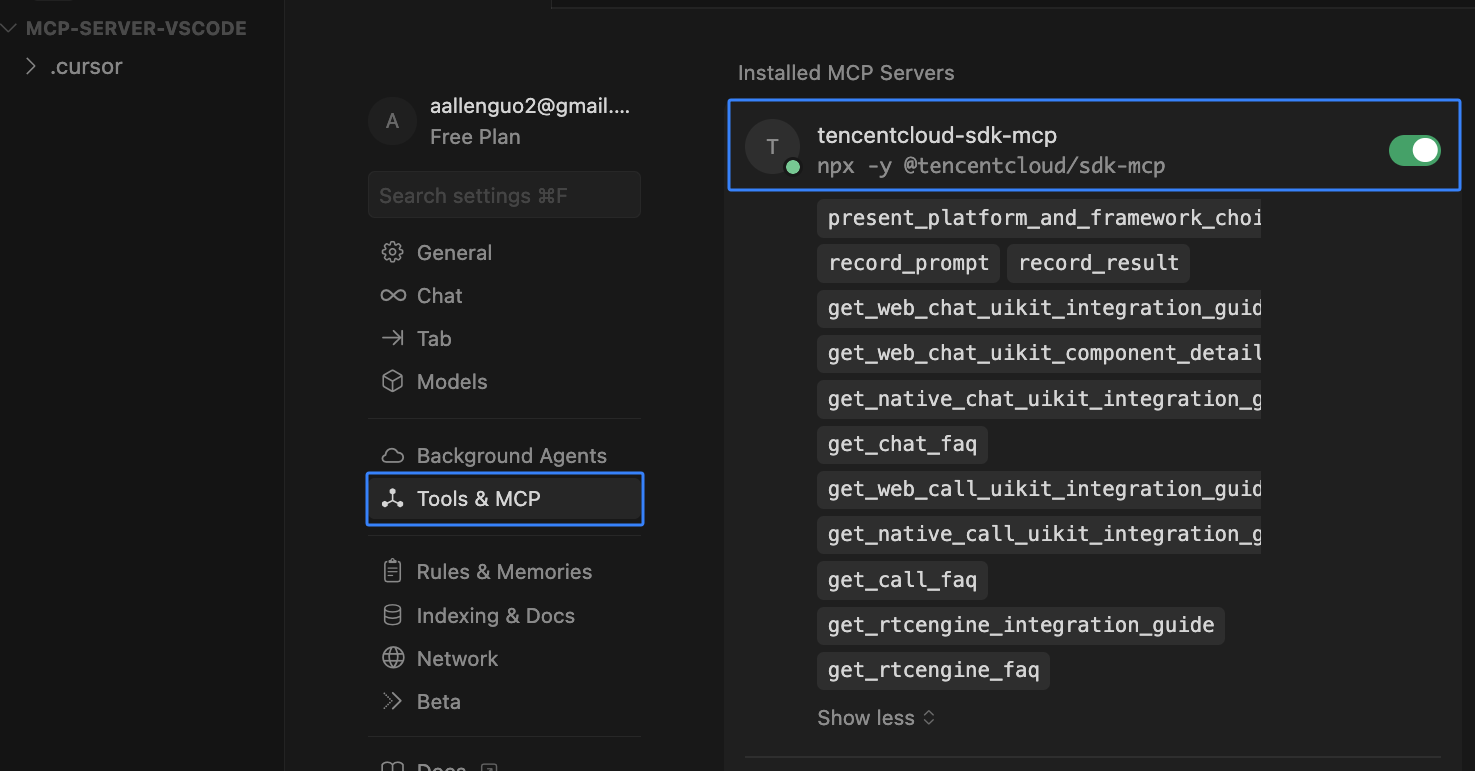
- After configuration is complete, check if MCP tools are successfully loaded in Cursor's Settings - Tools & MCP options.
【VSCode Configuration Guide】
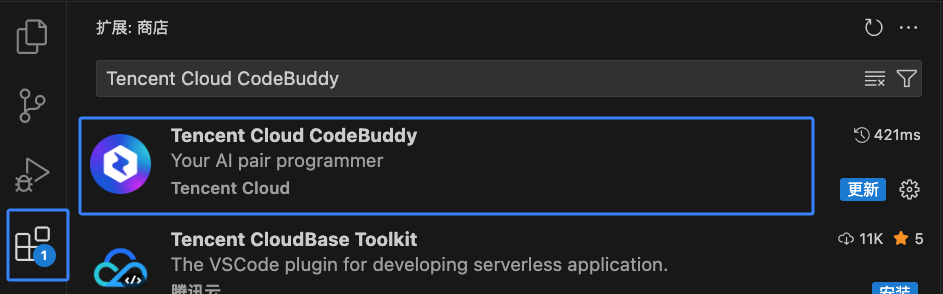
- Install the VS Code CodeBuddy plugin.
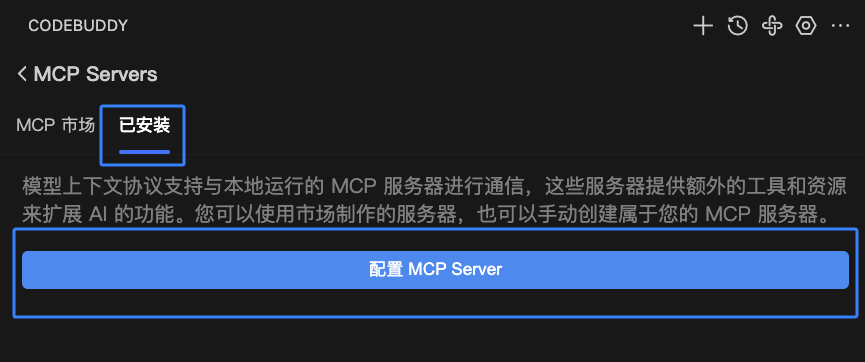
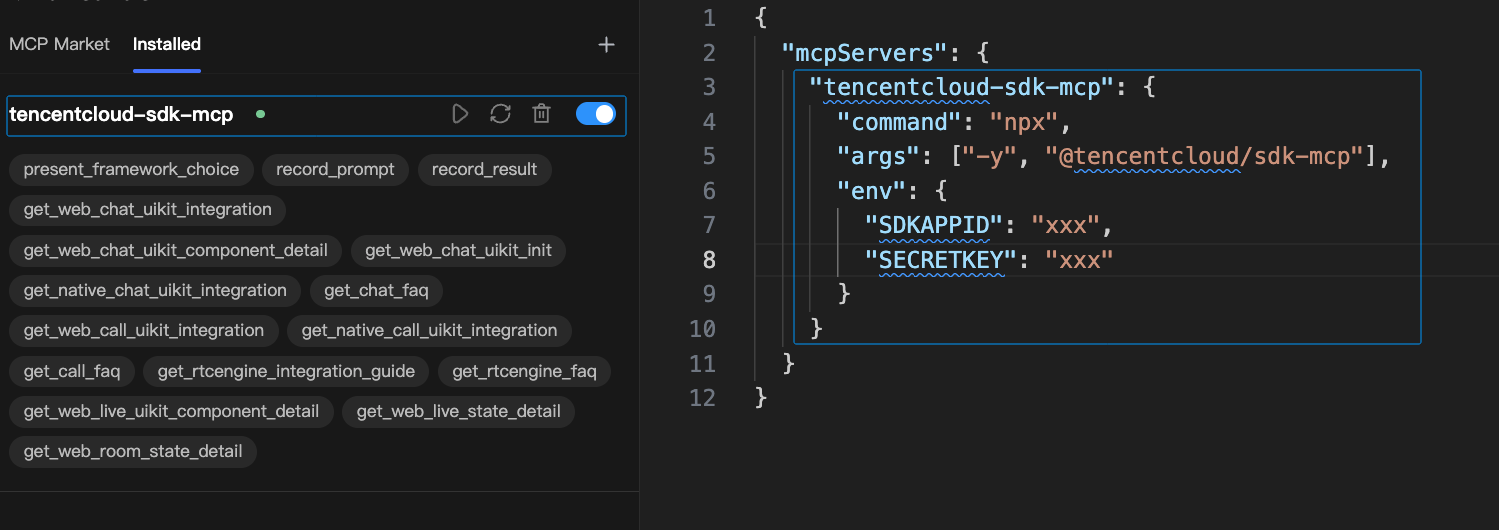
- After successful plugin installation, find the CODEBUDDY entry in the sidebar, click MCP Market Icon > Installed > Configure MCP Server.

- Update the
mcpServersconfiguration information to the configuration file and save it.
{
  "mcpServers": {
    "tencentcloud-sdk-mcp": {
      "command": "npx",
      "args": ["-y", "@tencentcloud/sdk-mcp"],
      "env": {
        "SDKAPPID": "YOUR_SDKAPPID",
        "SECRETKEY": "YOUR_SECRET_KEY"
      }
    }
  }
}
Note: Please save your modified configuration file promptly.
Windows Users:
Ctrl+S, Mac Users:Command+S.
- After successful saving, check if MCP tools are successfully loaded.
Step 3: Using AI Tools by Scenario
After configuration is complete, you can quickly integrate TRTC Web SDK by conversing with AI using prompts.
Scenario 1: Creating a Project from Scratch and Integrating
3.1 Create and Initialize Project
Input prompts, and AI will automatically create the project for you. After successful project creation, AI will automatically import TRTC Web SDK into the files.
Prompt Examples:
1. Please create an audio and video calling application using TRTC Web SDK.
2. Please create an audio and video calling application using TRTC Web SDK based on vue3.
3. Please create an audio and video calling application using TRTC Web SDK based on react18.
3.2 Obtain Login Account Information
After AI creates the application, you need to use your own SDKAppID to obtain login account information.
Prompt Example:
Please create a userid and userSig using the configured SDKAppID and fill them into the code.
3.3 Run the Project
Try running the project, entering rooms, pushing/pulling streams, etc. If you encounter exceptions, you can provide the exception information to AI for handling.
Scenario 2: Integrating TRTC Web SDK into an Existing Project
3.1 Dependency Installation and Component Import
Input prompts, and AI will help you integrate the SDK into your existing project. Be sure to specify the target file path in the prompt to improve AI operation accuracy (e.g., please integrate TRTC Web SDK in src/views/call.vue).
Prompt Example:
Please integrate TRTC Web SDK component in src/views/call.vue.
3.2 Obtain Login Account Information
After TRTC Web SDK integration is complete, you need to use your own SDKAppID to obtain temporary login account information.
Note: Temporary account information can be used for login experience during the development phase, but it is not recommended for use in production environments. In production environments, you need to deploy a userSig issuance service to generate login account information on the backend.
Prompt Example:
Please use MCP tools to generate a userSig for user test001 with my configured SDKAppID.
3.3 Fill in Login Credentials
After AI outputs the account information, let AI automatically fill all login information into the code.
Prompt Example:
Please fill SDKAppID, userID, userSig into the code.
Scenario 3: Problems Encountered During Integration Development
MCP integrates problems and solutions accumulated over the past decade during TRTC integration. AI can quickly solve problems encountered during development.
Prompt Example:
What are common problems and best practices when deploying TRTC Web SDK services? What redundant code should be avoided?
Step 4: Run the Project
-
AI will try to start the project using the startup commands configured in the project (e.g.,
npm run dev,pnpm run dev). -
If the project does not start automatically, you can manually input the startup command, and AI will automatically execute it.
Frequently Asked Questions
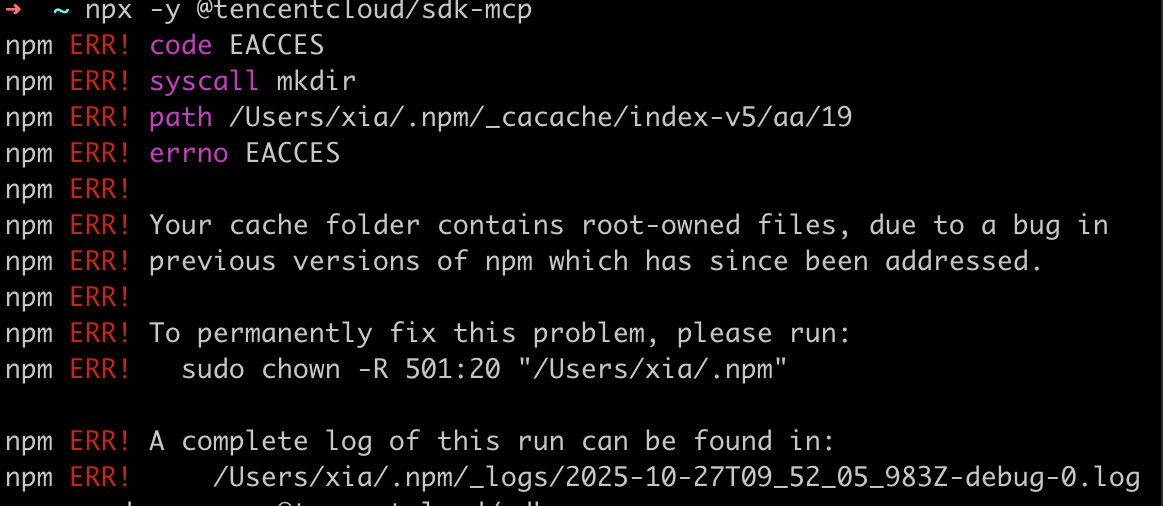
How to manually install MCP server?
If you need to manually install MCP server, execute the following command in the terminal:
npx -y @tencentcloud/sdk-mcp
If AI encounters folder access permission issues during project creation, how to solve it?
If you encounter local directory access permission issues, it is recommended to use sudo permissions to grant write permissions to the directory.
MCP tool-generated userSig login fails, what to do?
If the MCP tool-generated userSig login fails, it may be because characters were modified during automatic writing in certain specific IDEs. You can have AI regenerate it or manually copy the userSig into the code.